I don't have to remind you that I am obsessed with home decor or that I redecorate rooms more often than I blink {exaggeration. duh}. Nor do I have to tell you that I have the patience of a puppy.
Those things combined with my "Oh please, I can so do that myself" mindset led to a DIY filled weekend.
Lucky Fiance :)
First Project: Dining Table Chairs

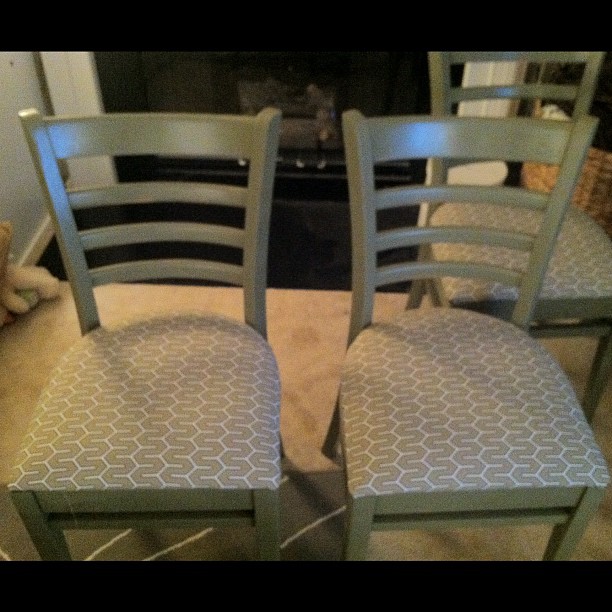
We scored 4 wooden chairs with cushions that were in great shape from Goodwill for $40! I knew it when I saw them that were full of potential and I probably couldn't get chairs for less expensive.
.JPG)
Off to the fabric store we went. We were looking for a great taupe/brown/white pattern OR a colorful blue/green pattern.

My insightful heart led me to this DwellStudio fabric. We fell in love instantly.
Then I found out it was 40% off. 911 was almost called to resuscitate my happy heart.

The chairs were then sanded down and painted a lovely green color. Then my handy fiance discovered his best kept skill. Upholstery! That man can work a staple gun.
Ohh these chairs make my heart skip a beat

The dining room is now more than just a table and bench. It feels like a real live dining room!!! Who wants to come over for dinner? :)

My mouth smiles and my heart swoons.
Happy Hopes & Dreams project: done!
The chair project was lengthy and included a bit of down time for drying. So in the meantime...I kept on crafting!

The dining room got new wall art. I am really happy with how this turned out- I love the colors and it feels balanced to me.
Left to right:
Words Canvas: gift from Mom The Easter Bunny
Large Dandelion Painting: I made yesterday with brown craft paint and a sheet of linen fabric. The art got tucked into a old frame, then I stepped on the frame and shattered the glass... not cool.
Green Medallion Canvas: Believe it or not, I used spray adhesive to glue wrapping paper from last Christmas to a blank canvas. I then used glossy Modge Podge to seal it and give it a sheen. Turned out great and hello inexpensive!
White Frames: I found these at the dollar store many moons ago; they will be filled with pictures of Mason very soon

The living room area above the couch also got new art. It looks soooo much better in person, I promise!
I used 3 old ikea frames and spray painted them glossy gray {to match the art over the fireplace, our rug and some other accents in the room} then filled them with scrap fabric.
The fabric in the middle is from my first DIY tray project, the other two are leftover striped fabric pieces from the fireplace project. Always save scrap fabric and don't throw away old frames!

While searching through my stash of craft materials I came across some great linen fabric and two old serving trays. The trays were salvaged during a clean-out-the-Cottage-Cheek-family-fun-weekend.
Using the same method as here, I covered the trays. To spice up the taupe linen, I pulled out my paint and got artsy. I just loooove this one, it turned out so well {especially given the fact that I was completely glued to Sunday night ABC tv shows}.

The other one is a bit more simple and classic. But I love it all the same {pun intended?...yeah}. I have trays all over the house, they instantly make tabletops, magazine stacks, remote controls, Miley food bowls, jewelry, candles, books, keys and mail look better. Wow...I really do have a lot of trays....
That just about does it for our DIY filled weekend! Other than the lingering smell of sanded wood and spray paint; the place looks great and feels more like home.
Couldn't have done it without the wonderful Josh, he is a fantastic DIY accomplice {probably because he is focusing on much money we are saving} and handy man.
Happy Hopes & Dreams!
:) amc
No comments:
Post a Comment
Thank you for your comment! It makes me so happy to hear from readers!
Let me know if you have any questions- I will always do my best to respond
:) amch